Monday, April 8, 2019

What To Do Now That Cogi Is Gone: 3 Note-Taking And Lecture-Recording Apps For the Tech-Savvy Student


A screenshot from Cogi

Long live Cogi - Beyond Notes, the note-taking, lecture-recording juggernaut of an app that recently got removed from the Play Store. If you check their website, the app is still listed as being on the Play Store and the App Store, but following the Google Play link brings you to a dead end. If Cogi is functioning erratically for you, or you simply never got to download the app to supplement the notes you take on paper, here are three pretty similar apps that get the job done just as efficiently as, if not better than Cogi. You can download them on your Android phone or tablet (or in some cases, iPad or iPhone) and do away partially or fully with paper notes.

1. Meeting Notes Taker - Recorder, memo and minutes

This app gets the number one spot simply because it is the closest in functionality to Cogi, if lacking the tagging feature and the ability to add images to sessions.

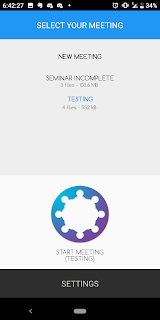
The front page of Meeting Notes Taker

The app was primarily built for taking notes during meetings, but can be appropriated for note-taking by students too. On the front page you are greeted with a list of 'meetings' or sessions, and the option to start a new meeting or session.
A cool feature of this app is that it allows you to assign multiple people to a meeting. So, if you're in class, you can later add the name of your teacher, as well those of all of the classmates who interacted with your teacher during that hour (although this can be confusing, because it requires you to go back to the meeting screen). Not unlike Cogi, this app allows you to have multiple recordings per session, and you can add individual notes to these recordings.
Two other cool features of this app are retrieving audio from up to five minutes before you pushed the record button, as well as a cool noise reduction filter to clean up your recordings. Though this app doesn't have dedicated cloud storage, unlike Cogi, you can always export your sessions to Dropbox or Google Drive. And it has a Night Mode, in case you decide you want the app to be all dark. It's easy to see why this app would be anyone's first choice if they're looking for a free and easy way to record their teachers' lectures. But if this app doesn't cut it for you, the next app on the list, which happens to be an all-rounder of sorts, just might cut it for you.

2. Evernote

If you do any sort of note-taking, be it noting down readings, or jotting down recipes from the internet, chances are you have heard of Evernote, and for good reason. Even its free tier is good enough for most purposes, but it is also an excellent app for recording lectures and adding your own flair to your notes (truly a note-taking suite!), whether you are a Basic user or a Premium user.
There is really no hard limit to the stuff Evernote can do. You can combine images, handwriting and voice recordings, into a single note, among other things. The only real limits seem to be the inability to use handwriting while recording audio, as well as the woefully small amount of bandwidth even paying users have (when it comes to voice notes). A good alternate to this app might be NOTEBOOK by Zoho Corporation, although I am yet to test this app to see if it makes up for any of the limitations of Evernote. I'll update this article accordingly, or make a new article altogether (NOTEBOOK is available on both Android and iOS). Another limitation of Evernote is that it records audio notes in amr format, which is slightly more lossy than many users would want. But hey, if you are for functionality versus quality, Evernote is the app for you.

EDIT: NOTEBOOK seems to allow you to simultaneously record audio and use handwriting, and the recording quality is miles ahead of Evernote. I would definitely recommend any serious student with an iPad or Android tablet/phablet with a stylus, to download NOTEBOOK.

3. Otter

This app deserves a special mention, if only for being the worst for free users. No screenshots will be given for this app, since I can hardly be bothered to use it, but basically it gives free users 600 free 'record minutes', after which you have to pay to upgrade to a plan that gives you 6000 record minutes a month. It tries to ape Cogi in the session thing, but where it fails is the abysmal speech-to-text algorithm it uses, which is horrible for an app that claims to use AI to improve speech-to-text. For basic recording purposes, Otter is good enough. But be prepared to make lots of corrections to the transcripts you end up with. Big nope for me!

Conclusion: For students wanting only basic recording and quick note-taking functionality, with a powerful noise-reduction algorithm, Meeting Notes Taker is the go-to app. Those looking for more advanced functionality such as handwriting and pictures, can look towards Evernote or NOTEBOOK. The more intrepid and spoilt-for-riches students might want to try Otter, but don't say I didn't warn you. If you can still sideload an apk of Cogi (in the case of Android users), you might want to do that, but the app itself seems to be quite erratic.

That's all for this article. Peace!

Thursday, January 28, 2016

Our Future In Space: Of Biology, Physics, and A Whole Lot of Different Stuff Thrown In


Yes, I know that's a very old quote, and perhaps some of you might see it as hackneyed or cliched. But all that is fine, because I'm about to discuss some pretty serious stuff with you guys here. In the next decade, Mars One will be sending manned missions to the Red Planet. No, I'm not a PR guy for Mars One, but neither do I believe that it is a scam of any sorts, any more than the moon landing was purportedly a hoax. Donations only fund their further development of resources, not get them a fancy Rolex from your favourite watch shop. Crowdfunding and not-for-profit anyone? Anyway, the reason I mention Mars One is that it came up in a conversation with a friend. He said, in a very cynical tone, that he pities those astronauts. Well, for my part, I believe they deserve a bit of respect for this intrepid venture, leaving behind all creature comforts at planet Earth, never to return again. Y'all might not know this, but I have a bit of a fascination with space travel, in particular space colonization. I was wondering how I could possibly do anything with this fancy, being a biotech student and all. It just so happens that one fine day, a guest speaker at our college delivered a lecture on diabetic retinopathy, and in particular, a pathway with a hitherto unspellable name (sounds like kinunirin) caught my attention. This pathway is supposedly associated with generation of free radicals as well as apoptosis. If we can inhibit this pathway, or destroy any potential free radicals, we can potentially extend human lifespan. Now to put things in perspective, some points you might consider.

Role of a biotechnologist/astrobiologist

It is often said that doctors and people involved in the life sciences carry the biggest burden on their heads, i.e., that to help sustain healthy human life. If a medical procedure were to be developed that put astronauts in suspended animation for days or even months on end, while drugs and biomedical devices leech the body of all toxins, free radicals, extra adipose tissue, etc. would be delivered continuously to these astronauts, they probably wouldn't be grandpas by the time they arrive on an exoplanet. The role of us biotechnologists is to work with doctors to develop such a procedure by the turn of the decade, and pass on the knowledge to future crew members. This would eliminate the need for generation ships and a struggle with your identity.

Role of a physicist

So many theories have been proposed regarding the universe, each as amazing as the other. However, the physicist's job here is not to formulate theories, but to develop methods of harnessing minerals from asteroids and other celestial bodies that may well lie in our journey to our next home, as well to develop a clean and renewable fuel. If this can be done, most of the problems faced by manned missions can be solved. To solve the issue of zero gravity, special shoes can be developed, that are interfaced to powerful electromagnets docked below the main ship.

Food  

In order to better adapt to changing living conditions, astronauts' diet will be more plant-based than ever. That means, we'll have to say goodbye to a lot of stuff, including ruminant cheese. However, with major advancements in biotechnology, it may be possible to hydroponically grow biofortified plants with some of the characteristics of our contemporary food. Soybean for example, can be engineered so that the soymilk becomes more fit for production of butter and cheese. A good alternative to your everyday milk sausage would be tofu, mashed potatoes, baked beans, and toast. Now don't get me wrong. I'm not a vegan advocate. Hell, I can't imagine life without chicken. However, the benefits of raising poultry and livestock onboard a space craft, are far outweighed by all the associated diseases, and the fact that such a thing is not profitable from a utilitarian standpoint. Superfoods and nutritional supplements will become the norm, and it will be the prerogative of microbiologists to carefully culture probiotic organisms.

These are just some of the ideas in my head for a potential mission to say, Europa. More on this on a later post. Cheerio!


Monday, January 25, 2016

Download Torrents In the Cloud: Offload Torrents To MEGA and AWS with A Simple Script

Hey guys, Charioteer Mode back with another awesome tutorial. Since Hive.im closed its doors to free users, and Baidu started acting erratic when leeching torrents, here is a new, novel method to download torrents directly to your AWS or MEGA cloud drive. The only limiting factor here is your storage plan. I'd recommend you sign up with MEGA (mega.nz) before proceeding to the first step.

1. Create a Heroku account.


Heroku is a service for deploying apps in the cloud. Among other things, with a premium account, you will have enough juice to mine cryptocurrencies. However, we're focusing on the free tier here, which also gets a hell lotta work done. After filling up all the details and clicking on 'Create Free Account', click on the verification link in your email.

2. Deploy Torrent-Cloud to Heroku


Go to https://github.com/jpillora/node-torrent-cloud, scroll down to the 'Deploy to Heroku' button, and click it. You will be led to a page on which you will have to specify a new domain name for your 'app' (Heroku works as app modules).
1. In MEGA_EMAIL, type your MEGA email.
2. In MEGA_PASS, type your MEGA password.
When you click create, you will have a brand new app (actually the Torrent-Cloud javascript) running in a new URL, connected to your MEGA cloud. It should look something like this:
I've blacked out my domain name because I don't want people spamming my cloud storage with random shit and filling it up.

FAQ:
1. After I refresh the page, or close the tab and reopen the app, it gives me a bunch of errors at the bottom, and the webpage looks totally different. What do I do?
Solution: No problem, just go to your dashboard in Heroku, and change the domain name, and then use the app with the new URL. Although I suggest you constantly keep the Torrent-Cloud app tab open.

2. Will this affect my leeching downloads?
Solution: No, although leech speed may be decreased.

3. My speed decays to 0 B/s after a couple of MBs. Why?
This can happen due to one of two reasons:
1. You have run out of data on your cloud storage or
2. It's loading the next buffer. Buffer size for torrents on Torrent-Cloud is 50 mb.

4. What cloud services are supported?
Currently, only MEGA and AWS (Amazon Web Services) are supported. Also, since this is a depreciated repository, it is not likely to be updated in the future.

5. Can I mine bitcoins/litecoins/Dogecoins with the free tier of Heroku?
Short answer: no. Long answer: Free tier access gives you only 512 mb RAM in the cloud, which is worser than that of even the cheapest PC available today. It would take decades to mine a few satoshi with an i5 standard gaming rig, so unless you are an immortal being who can live for millenia, mining bitcoins is not possible in the free tier of Heroku. Invest a little money though, and you can get good results, sometimes within 24 hours.

Thank you!

Tuesday, July 21, 2015

How To Direct Download Torrents, As Of 2015 (19-2000 GB)

Hi guys, Parthasarathi here, with another enlightening post. In my post about the VPN TunnelBear, I said that I would do a post on how to direct download torrents. Well, here are three methods that you can use.

1. Premium Download Speed, Upto 19 GB File Size

I hit upon this method after months of frustrated downloads using third-party filehosting sites. Turns out, there is a site that converts your torrent file to a direct download link, provided it is less than 19 GB. It then uploads your link to either Uptobox (with free premium link generator) or 1fichier. If this weren't enough, consider this: there is virtually no speed capping or download limits, or even fixed bandwidth. The site, funnily enough, has a pretty obvious name, Torrent2DDL. So first of all, I'm gonna show you how to download from http://torrent2ddl.com.

Step 1: Create an account on the site, and then login, as shown below:

Step 2: Get a magnet link from a torrent site.
Step 3: Paste it in Torrent2DDL, choosing Uptobox as the PLG.


Step 4: Wait for your torrent to debrid, and you're all set!

When you hit the download button, you will be redirected an Uptobox page that says that there is currently a happy hour going on, so you can download unlimited premium. That there is here to stay, and you can now copy the generated download link and paste it into your preferred download accelerator.


2. Movies and Music Only

Another great service you can use is http://hive.im, a self-proclaimed unlimited cloud storage that allows you to download movies and music with a catch: without a premium account you are limited to 50 gb of inbound transfers (although you can download as much as you want) per month, and it is a generally suckish feature of even premium accounts that you can't download a torrent with batches of videos, for example an entire season of your favourite sitcom. However, you can leech full music albums, so that is always a plus point. Unlike Torrent2DDL, Hive does not allow you to download all the files in a torrent as a zip or rar file. Sign up with Facebook, go to your Media Stream, and enjoy. Another discouraging thing about Hive is the capped download speeds, but I haven't had problems in general with it in college. I downloaded 4.7 gb file in 2 hours 40 minutes, which says much, because my college did not have good download speeds, at least not on my floor.

3. Pretty Much Anything You Want, Cloud Storage Extendable Upto 5 TB

This is by far the best method to download torrents, because the native download manager acts both as a file leeching service, and as a de-facto bittorrent client (in that it provides resumability, and you can switch off your computer without any worries and resume the download just as you would with a bittorrent client). The service that we will be using is Baidu Yun. There is a somewhat outdated tutorial on http://currentmattersplus.blogspot.in/2014/07/baidu-yun-baidu-cloud-tutorial-i.html, on how to create an account, and how to download files, but there is one difference: now, SMS verification is also compulsory, and you will be prompted to enter your mobile number after you click the email verification link. You'll see a dropdown menu with numbers, beginning with 00. That's your country code, and the 00 is interchangeable with +. For example, India is 0091, or +91. Select your country code, enter your number, click the button just below, wait for the SMS to arrive, and enter your the verification code before the timeout. Hit the button below that field, and you're done for the time being. You now have 2 gb of free cloud storage! To extend the storage to 2 TB, download and install the Android or iOS app, login using it, and you're done! Please note that this automatically sync your phone's camera photos with your Baidu Yun cloud storage. To extend the storage further to 5 TB, buy a premium subscription! I tried Baidu after people suggested using one of Tencent's services, about whose status as free, premium or freemium, I'm not so sure. Oh, and here's a screenshot of a (torrent) file downloading in Baidu Yun:


If you minimise the window, you will still see a small bar indicating the download status, in your browser, or on your desktop. 


Well, that's it for now. Toodle-oo peeps! Be sure to leave your love in the comments below! Share this post with any friends in need of a torrent download solution, either because of blocked ports, or DMCA complaints. Signing off!


Saturday, April 18, 2015

Students' Special! Amity Special! Digimon Special! Bypass Web Filtering And View Blocked Content (Such As Geo-Restricted Videos)

Hey guys, so here I am, your blogger mate Charioteer Mode, and I have some really great news for those who're restricted from watching videos or accessing content that is not generally available in your region. For example, you might be living in India and trying to access CBS videos (say, episodes of The Big Bang Theory), or you might just be living anywhere in the world, and you're pissed off by the fact that you can't access some of your favourite anime or anime events on Crunchyroll or Nicovideo. This is especially true for those people who can't access Hola Unblocker or get it to work for some reason. This article will also be helpful for those of you who live in the hostel campus of a university that actively throttles connections and blocks almost all forms of proxy avoidance (for example, Amity University). I've found out a way for those of you facing these problems, to access the videos you want, from anywhere in the world. I stumbled across this solution while trying to find a way to ensure that I'll be able to watch the Japan-exclusive Digimon Adventure Tri event when it airs on Nicovideo Live. So, here are the steps. Hopefully, if you follow these steps correctly, you'll end up having a Japanese IP for Nico Nico, an American IP for Netflix/CBS, and so on and so forth.

1. Using a proxy site that IS allowed on your server, such as 2proxy or Sitenable, open the Spotflux website. In this screenshot, I've opened the Spotflux website from within Spotflux itself, for simplicity. Click on 'Try Spotflux free'. If you don't want to install Spotflux, in case you can access the TunnelBear website completely, and due to other reasons as well, skip steps 1-3.


2. Choose your platform. If you choose Windows, you may get a file called sf-install-web.exe. Alternatively, you may download the offline installer from any site that has the current (or even old, doesn't really matter; it updates automatically anyway) version. Now, open the setup file, follow the instructions, and install Spotflux on your computer.


3. After you set up Spotflux, and add your new Spotflux login credentials (you need to create an account first; I suggest using a proxy to do this), you should get something like the image depicted, in your taskbar.


See that little box with the black frame outline, and a silver pyramid thingy protruding from it? That's an inactive Spotflux. Click on it.


You'll get something like the above window. Now, power on your protection by clicking on that little power switch icon that says 'No Protection'.


You should now be connected to a server in the US.

4. Now open the TunnelBear website.


Navigate to the top right corner where it says 'Login', and click on the little arrow that's pointing downwards.


Now click on 'Sign up for TunnelBear'. You should get to the screen shown below.


Enter your first name, email address and preferred password. Now here's the important part.

IMPORTANT: Disable Spotflux protection before clicking on 'Create Account'. Otherwise, you'll get a message along the lines of 'Rawwrrr! Too many registration requests here. Please try again in a week.

After you click on 'Create Account', you'll receive a confirmation email. Click on the link in the confirmation email to activate your account.

5. Now download the TunnelBear client, or as the guys at TunnelBear put it, 'Download a TunnelBear.'


Click on 'Download a TunnelBear'. You can also get the Android and iOS apps, but you'll probably have to register a premium account to install it on multiple devices. Anyway, we'll be getting to that later. Now install TunnelBear. The setup process is kind of funny, because instead of 'Extracting files', it says stuff like 'Unpacking your bear'. On setup completion, you will be prompted to either enter your login details or create a new account. Enter your login details and proceed to the next step.

6. After you're done with installing and setting up your TunnelBear, you should get a screen like this.


Select a country from the drop-down list. I've selected Japan, because I want to stream videos restricted to Japan. Now flick the switch on.


It will take some time to connect. Unlike Spotflux, this process is not instantaneous, and will take about 2-5 minutes.


There, you're all done! If you have trouble connecting, and rarely does this happen, go to the settings menu, and enable TCP Override.


Now, about the pricing. You might notice that the screenshots above show my current data to be about 1.3 gb. But you'll get 500 mb by default per month. So, how did I get extra data for free? Well, you can tweet to TunnelBear once a month, and once that's done, you'll be credited with an extra 1 gb of data. Their premium plans are pretty cheap. Their Giant Bear costs only $5 (actually $4.99) per month, and gives you unlimited bandwidth, and their legendary Grizzly Bear costs $50 (actually $49.99) per year, which means you're billed only once a year, and you save $10 on the whole. Now, if you're living in India, and you have a MasterCard, doesn't matter if it's a credit card or a debit card, you can easily create a PayPal account, and set that as your payment method, because let's face it: $5 per month? That's like 300 rupees by today's exchange rates, and you pay more than that when you go to KFC, or say, buy a half bottle of vodka. Hope you guys enjoyed this article. If you have any issues with this method, you may write about it in the comments below. If you find this article helpful, support me by clicking on the ads. Or forget that. Even a small 'thank you' will suffice. Charioteer out. Peace!

P.S.: If you use TunnelBear, even on a network where torrents are allowed, the BitTorrent ports will be temporarily blocked until the TunnelBear session ends. In other words, you can't download torrents with this method. I'll get to the torrents part in another article.


EDIT: Here's some image proof:

As you can see, I have successfully accessed the live stream's page, and timeshifted it, so that I can watch it from the start 30 minutes after it starts airing. 

Thursday, April 16, 2015

I Can Earn, And So Will You! (The Power of Altruism)

Ok, now before you go all gooey and emotional on me, no this article is not about 'sharing is caring', the joy of giving, and the usual stuff, which is all true, by the way. No. Today, I have something for those of you who want to earn money from just referring people to a site. That's right, you heard me right! Okay, so here's how it goes. I'll get right to it once you hear my entire story. AdSense is going all ninja on me, so I decided to switch to a better alternative (let's face it, I don't have a whole lot of money to spend in college, and probably you don't too). It's called, and the name is not a deception, it does exactly what it says, RevenueHits. So what is RevenueHits, you might ask? It is another contextual advertising service that runs ads on your site or blog, just like the ones from AdSense, Clicksor, Chitika, etc. would. Granted, you need a PayPal account if you're a resident of India (I don't think wire transfer is available here), but you don't need to specify any payment details until your balance hits the minimum $30. Now here comes the fun part. RevenueHits has something called a referral link. You've probably heard of it before if you were ever looking on the internet for a way to use services such as Furk.net or ZZLBox to leech torrents (basically to circumvent your school/college's torrent blocking). It is an incentive system in which you get rewards if somebody signs up for the service using the link you provided. In the case of RevenueHits, you get a shareable referral link, and if somebody signs up for RevenueHits using your referral link, you can earn upto $100 extra. And you know what the best part is? It's completely free! The ads you run are given to you as HTML code, which you then insert in your blog or site (this is very easy if you're using Blogger, or say, WordPress). So, let's say you click my referral link. So I earn money. Then you refer someone else, say your best friend Sally. You get money if Sally signs up. Sally can then send her referral link to others, and the process continues weblike (I say weblike, and not chain-like, because you'll be earning separately for multiple people signing up using your referral link). It's an exciting prospect, because then you'll finally have enough cash to go and see that new movie you always wanted to see with your friends, buy decent headphones, get a professional facial, have a bottle of the finest wine, or if you're like me, eat the best and most expensive non-veg and seafood in the whole city. The possibilities are endless, and no this is not a gimmick or a honeypot (by advertising on your site, the guys at RevenueHits are earning a solid amount of cash too, and you're just getting a share of it), and yes this has been tried and tested before. This is how any self-respecting blogger earns his money: Sign up for AdSense or RevenueHits, post regularly on the blog, and earn some extra money. So if you think you're ready to finally earn some extra cash, and shed off the baggage of your limited college budget, sign up here, and share your referral link with your friends. Charioteer out! Peace!

Monday, April 13, 2015

New Manga Style Webcomic! The Untitled Tale!!

Hey guys, as some of you who're my Facebook friends are aware, I started writing a fanfic series on the lives of 8th Mile Stone, Frappe Ash, myself, and some more superstars from St. Gabriel's Academy, in my Facebook Notes. So, I've decided to finally turn it into a webcomic. I've released the first chapter, and will begin work on the second chapter after my exams end in late May. Here's the first chapter, hosted on The Duck Webcomics. Any kind of feedback is welcome!! :)

http://www.linkbucks.com/B7LJn