Showing posts with label Students. Show all posts

Monday, April 8, 2019

What To Do Now That Cogi Is Gone: 3 Note-Taking And Lecture-Recording Apps For the Tech-Savvy Student


A screenshot from Cogi

Long live Cogi - Beyond Notes, the note-taking, lecture-recording juggernaut of an app that recently got removed from the Play Store. If you check their website, the app is still listed as being on the Play Store and the App Store, but following the Google Play link brings you to a dead end. If Cogi is functioning erratically for you, or you simply never got to download the app to supplement the notes you take on paper, here are three pretty similar apps that get the job done just as efficiently as, if not better than Cogi. You can download them on your Android phone or tablet (or in some cases, iPad or iPhone) and do away partially or fully with paper notes.

1. Meeting Notes Taker - Recorder, memo and minutes

This app gets the number one spot simply because it is the closest in functionality to Cogi, if lacking the tagging feature and the ability to add images to sessions.

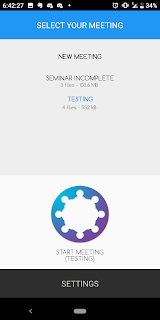
The front page of Meeting Notes Taker

The app was primarily built for taking notes during meetings, but can be appropriated for note-taking by students too. On the front page you are greeted with a list of 'meetings' or sessions, and the option to start a new meeting or session.
A cool feature of this app is that it allows you to assign multiple people to a meeting. So, if you're in class, you can later add the name of your teacher, as well those of all of the classmates who interacted with your teacher during that hour (although this can be confusing, because it requires you to go back to the meeting screen). Not unlike Cogi, this app allows you to have multiple recordings per session, and you can add individual notes to these recordings.
Two other cool features of this app are retrieving audio from up to five minutes before you pushed the record button, as well as a cool noise reduction filter to clean up your recordings. Though this app doesn't have dedicated cloud storage, unlike Cogi, you can always export your sessions to Dropbox or Google Drive. And it has a Night Mode, in case you decide you want the app to be all dark. It's easy to see why this app would be anyone's first choice if they're looking for a free and easy way to record their teachers' lectures. But if this app doesn't cut it for you, the next app on the list, which happens to be an all-rounder of sorts, just might cut it for you.

2. Evernote

If you do any sort of note-taking, be it noting down readings, or jotting down recipes from the internet, chances are you have heard of Evernote, and for good reason. Even its free tier is good enough for most purposes, but it is also an excellent app for recording lectures and adding your own flair to your notes (truly a note-taking suite!), whether you are a Basic user or a Premium user.
There is really no hard limit to the stuff Evernote can do. You can combine images, handwriting and voice recordings, into a single note, among other things. The only real limits seem to be the inability to use handwriting while recording audio, as well as the woefully small amount of bandwidth even paying users have (when it comes to voice notes). A good alternate to this app might be NOTEBOOK by Zoho Corporation, although I am yet to test this app to see if it makes up for any of the limitations of Evernote. I'll update this article accordingly, or make a new article altogether (NOTEBOOK is available on both Android and iOS). Another limitation of Evernote is that it records audio notes in amr format, which is slightly more lossy than many users would want. But hey, if you are for functionality versus quality, Evernote is the app for you.

EDIT: NOTEBOOK seems to allow you to simultaneously record audio and use handwriting, and the recording quality is miles ahead of Evernote. I would definitely recommend any serious student with an iPad or Android tablet/phablet with a stylus, to download NOTEBOOK.

3. Otter

This app deserves a special mention, if only for being the worst for free users. No screenshots will be given for this app, since I can hardly be bothered to use it, but basically it gives free users 600 free 'record minutes', after which you have to pay to upgrade to a plan that gives you 6000 record minutes a month. It tries to ape Cogi in the session thing, but where it fails is the abysmal speech-to-text algorithm it uses, which is horrible for an app that claims to use AI to improve speech-to-text. For basic recording purposes, Otter is good enough. But be prepared to make lots of corrections to the transcripts you end up with. Big nope for me!

Conclusion: For students wanting only basic recording and quick note-taking functionality, with a powerful noise-reduction algorithm, Meeting Notes Taker is the go-to app. Those looking for more advanced functionality such as handwriting and pictures, can look towards Evernote or NOTEBOOK. The more intrepid and spoilt-for-riches students might want to try Otter, but don't say I didn't warn you. If you can still sideload an apk of Cogi (in the case of Android users), you might want to do that, but the app itself seems to be quite erratic.

That's all for this article. Peace!

Saturday, April 18, 2015

Students' Special! Amity Special! Digimon Special! Bypass Web Filtering And View Blocked Content (Such As Geo-Restricted Videos)

Hey guys, so here I am, your blogger mate Charioteer Mode, and I have some really great news for those who're restricted from watching videos or accessing content that is not generally available in your region. For example, you might be living in India and trying to access CBS videos (say, episodes of The Big Bang Theory), or you might just be living anywhere in the world, and you're pissed off by the fact that you can't access some of your favourite anime or anime events on Crunchyroll or Nicovideo. This is especially true for those people who can't access Hola Unblocker or get it to work for some reason. This article will also be helpful for those of you who live in the hostel campus of a university that actively throttles connections and blocks almost all forms of proxy avoidance (for example, Amity University). I've found out a way for those of you facing these problems, to access the videos you want, from anywhere in the world. I stumbled across this solution while trying to find a way to ensure that I'll be able to watch the Japan-exclusive Digimon Adventure Tri event when it airs on Nicovideo Live. So, here are the steps. Hopefully, if you follow these steps correctly, you'll end up having a Japanese IP for Nico Nico, an American IP for Netflix/CBS, and so on and so forth.

1. Using a proxy site that IS allowed on your server, such as 2proxy or Sitenable, open the Spotflux website. In this screenshot, I've opened the Spotflux website from within Spotflux itself, for simplicity. Click on 'Try Spotflux free'. If you don't want to install Spotflux, in case you can access the TunnelBear website completely, and due to other reasons as well, skip steps 1-3.


2. Choose your platform. If you choose Windows, you may get a file called sf-install-web.exe. Alternatively, you may download the offline installer from any site that has the current (or even old, doesn't really matter; it updates automatically anyway) version. Now, open the setup file, follow the instructions, and install Spotflux on your computer.


3. After you set up Spotflux, and add your new Spotflux login credentials (you need to create an account first; I suggest using a proxy to do this), you should get something like the image depicted, in your taskbar.


See that little box with the black frame outline, and a silver pyramid thingy protruding from it? That's an inactive Spotflux. Click on it.


You'll get something like the above window. Now, power on your protection by clicking on that little power switch icon that says 'No Protection'.


You should now be connected to a server in the US.

4. Now open the TunnelBear website.


Navigate to the top right corner where it says 'Login', and click on the little arrow that's pointing downwards.


Now click on 'Sign up for TunnelBear'. You should get to the screen shown below.


Enter your first name, email address and preferred password. Now here's the important part.

IMPORTANT: Disable Spotflux protection before clicking on 'Create Account'. Otherwise, you'll get a message along the lines of 'Rawwrrr! Too many registration requests here. Please try again in a week.

After you click on 'Create Account', you'll receive a confirmation email. Click on the link in the confirmation email to activate your account.

5. Now download the TunnelBear client, or as the guys at TunnelBear put it, 'Download a TunnelBear.'


Click on 'Download a TunnelBear'. You can also get the Android and iOS apps, but you'll probably have to register a premium account to install it on multiple devices. Anyway, we'll be getting to that later. Now install TunnelBear. The setup process is kind of funny, because instead of 'Extracting files', it says stuff like 'Unpacking your bear'. On setup completion, you will be prompted to either enter your login details or create a new account. Enter your login details and proceed to the next step.

6. After you're done with installing and setting up your TunnelBear, you should get a screen like this.


Select a country from the drop-down list. I've selected Japan, because I want to stream videos restricted to Japan. Now flick the switch on.


It will take some time to connect. Unlike Spotflux, this process is not instantaneous, and will take about 2-5 minutes.


There, you're all done! If you have trouble connecting, and rarely does this happen, go to the settings menu, and enable TCP Override.


Now, about the pricing. You might notice that the screenshots above show my current data to be about 1.3 gb. But you'll get 500 mb by default per month. So, how did I get extra data for free? Well, you can tweet to TunnelBear once a month, and once that's done, you'll be credited with an extra 1 gb of data. Their premium plans are pretty cheap. Their Giant Bear costs only $5 (actually $4.99) per month, and gives you unlimited bandwidth, and their legendary Grizzly Bear costs $50 (actually $49.99) per year, which means you're billed only once a year, and you save $10 on the whole. Now, if you're living in India, and you have a MasterCard, doesn't matter if it's a credit card or a debit card, you can easily create a PayPal account, and set that as your payment method, because let's face it: $5 per month? That's like 300 rupees by today's exchange rates, and you pay more than that when you go to KFC, or say, buy a half bottle of vodka. Hope you guys enjoyed this article. If you have any issues with this method, you may write about it in the comments below. If you find this article helpful, support me by clicking on the ads. Or forget that. Even a small 'thank you' will suffice. Charioteer out. Peace!

P.S.: If you use TunnelBear, even on a network where torrents are allowed, the BitTorrent ports will be temporarily blocked until the TunnelBear session ends. In other words, you can't download torrents with this method. I'll get to the torrents part in another article.


EDIT: Here's some image proof:

As you can see, I have successfully accessed the live stream's page, and timeshifted it, so that I can watch it from the start 30 minutes after it starts airing.